Creating a Pokédex Chatbot in Discord (Part 2)
Discord Pokédex Chatbot Tutorial (Part 2)

Before we start coding, let’s recap what our project entails:
- Give Pokemon Information
- Display
- Pokemon Number - (No. XXX)
- Name
- Sprite/Avatar
- Category
- Height - Ft’ Inches”
- Weight - lbs
- Speak (Voice Functionality)
- “[Name], the [category] pokemon, [species description]. (https://www.youtube.com/watch?v=u_R-KfBlCIE)”
- Display
- Not Found Error Handling
- Displays “No Data”
Sweet, now that we know the full scope of our project, let’s start coding.
Getting Started
Let’s start by going over the external services and framework we are going to leverage in this tutorial.
Pokédex Information
We will be using the PokeAPI, which provides a tremendous amount of content regarding Pokemon information (abilities, stats, types, sprites, and more).
Feel free to spend some time exploring the API to get an idea of what’s available. Also, we will be using an API wrapper for Node.js to allow us to easily interact with the API. Fortunately, PokeAPI provides us with a node-based wrapper called Pokedex-Promise-V2.
Chatbot Framework
The next technology we will look at is the framework. To simplify interactions chatbot nuisances, I’m a big fan of Botkit, something I’ve tested and used in a production environment as well.
Discord isn’t a built-in platform, but I’ve created an open-source custom connector called botkit-discord to simplify that piece for you.
This will abstract the configuration and Discord functionality for our tutorial, as well as give us all of the botkit methods a lot of us are familiar with.
##Time to Code
First off, let’s clone a Discord starter provided by Glitch.
$ git clone https://github.com/FogCreek/starter-discord.git
This will cut some time on how to prepare and organize your code — and some typical bootstrapping.
Now let’s install our dependencies and add a few additional (pokedex-promise-v2 @google-cloud/text-to-speech):
$ npm install && npm install pokedex-promise-v2 @google-cloud/text-to-speech --save
Directory Structure
If we take a look at the repository, we can see the directory structure as following:
|-- public
    |-- client.js
    |-- install.js
    |-- style.css
|-- skills   // Where all our bot commands will be located
    |-- hears.js
|-- views // Don't worry about this
    |-- index.html
    |-- install.hmtl
    |-- remix.html
|-- server.js  // Webserver code
|-- bot.js  // Bot setup code
|-- package.json
... other files omitted
Most of these files you won’t be concerned with, but expect to be doing a bit of work within the skills directory.
1. Searching For Pokemon: “!pokedex”
Start by creating a new directory called services, where we will be storing all of our external API code.
$ mkdir services
Within the services directory, create a new file called pokedex.js and add the following code:
const Pokedex = require('pokedex-promise-v2'); // Import the SDK
const api = new Pokedex(); // Create API instance

module.exports = {
	search:  target => {
        // getPokemonByName provides both number or name lookup
		return api.getPokemonByName(target);
	}
}
Here we are essentially creating a “wrapper” over the SDK to give us flexibility. Thus, if our external API were to ever change, we can just alter this “service” file and never have to touch our core bot logic.
Now we can write our first “skill”, the search functionality.
Create a new file in the skills directory called, “pokedex” with the following code:
// Import our Pokedex sevicee
const Pokedex = require('../services/pokedex');

module.export = controller => {
    // Define controller methods here
}
🚨 HELP! What’s happening?!
Well in our bot.js code, we are manually calling any file in our skills directory. This is where we can create “hears” handlers for our botkit controller. If you aren’t familiar with the “hears” method, I encourage you to go over the botkit basics to understand how it all works.
Now, let’s create our newest skill:
// STEP 1: Add our parser helper
// This will parse the message from the sender
// ie: "!pokedex pikachu" -> "pikachu"
//     "hello !pokedex pikachu" -> pikachu
const parseParameter = (command, text) => {
	const start = text.indexOf(command);
	const textStart = text.substring(start)
	const parameters = textStart.split(" ");

	if (parameters[1]) {
		return parameters[1];
	}
	return null;
}

// STEP 2: Set up our hears method
module.exports = controller => {
	const POKEDEX_CMD = '!pokedex';

	controller.hears(
		POKEDEX_CMD, // this is our command
		// We define the context of when our bot should hear this command
		// ambient = all of chat the bot is in
		// direct_message = any messages directly sent to the bot
		['ambient', 'direct_message'],
        (bot, message) => {
            const parameter = parseParameter(POKEDEX_CMD, message.text);

            if (parameter) {
           		// Search logic here
            } else {
                bot.reply(message, 'Hmm what do you want me to search? Please try again, "!pokedex <number or name>"');
            }
		}
	)
}
If you look at the code, we are only telling the bot to “hear” for a “!pokedex” in a message and do something with it. But if the user doesn’t provide something to search with we just provide them a little assitance:
bot.reply(message, 'Hmm what do you want me to search? Please try again, "!pokedex <number or name>"')
Time to add our search functionality with using our imported service:
Pokedex
    .search(parameter)
    .then(result =>
    	bot.reply(message, result.name)
    )
    .catch(() =>
       	bot.reply(message, 'NO DATA')
    );
Here, we are using our search method that supports number or name lookups, and returning the result to our recipient.
Howevere, if we can’t seem to find a match, we will simply reply with “NO DATA”, just to match the typical Pokédex experience!

Great now we can test this by adding our bot token to the bot.js file within the configuration object.
🚨
If you don’t know how to get your bot token, I suggest you follow my previous magic 8-ball tutorial, this will walk you through setting up the discord bot and how to create your token.
/bot.js
const configuration = {
	token: `<TOKEN HERE>`
};
Once we’ve configured our token, start up our bot locally by running npm start, which will show that your bot is ready to respond once it’s been logged in.

Once it’s up and running, let’s message our bot with a few test commands:
!pokedex 1— Expect a resulthello !pokedex 1— Expect a resulthello !pokedex 99999— Expect “NO DATA”

Now that’s poke-mazing!
But you know what would be more amazing? If we take it up a notch and show an embedded message to our users to match our high fidelity mock.
So let’s talk about how we can create Discord Rich Embedded Messages.
####1.1 Rich Embed
As mentioned in our first part of the tutorial, our embedded message is going to give it more of a realistic Pokédex experience.
If you don’t remember what this looks like, let’s refer to the picture below as a refresher:
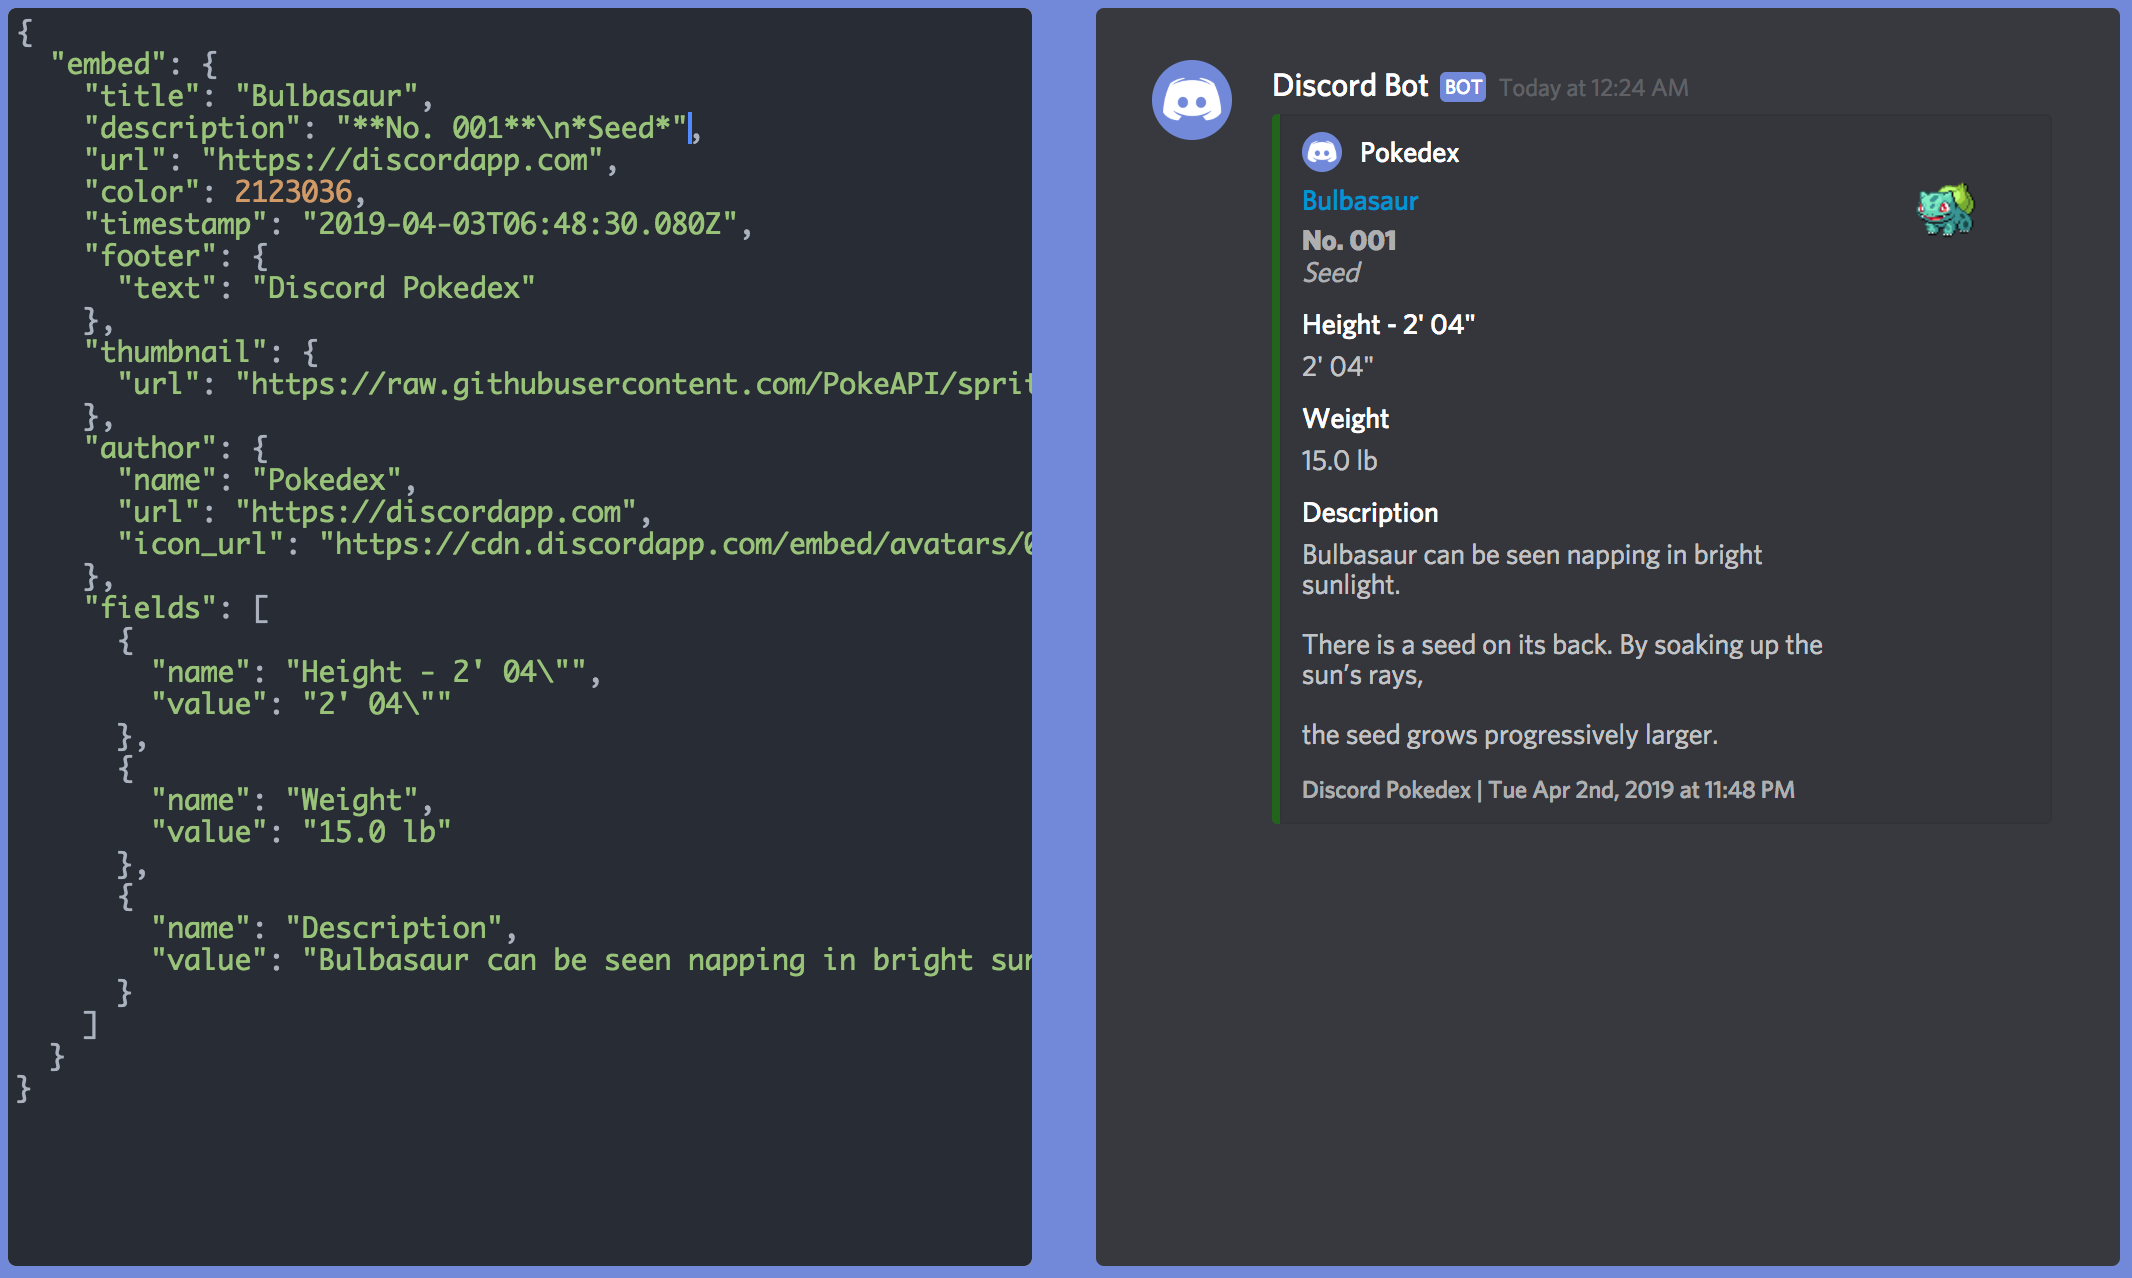
Using the Discord rich embed visualizer created by Github user, leovoel, we crafted this experience for our users. On the left side of the image, we can also see how our JSON payload should be sent to Discord for it to render like this.
But wait… is there an easier way to build this JSON in a less error-prone fashion?
This is where the builder pattern comes in handy!
“The Builder is a design pattern designed to provide a flexible solution to various object creation” — Wikipedia
Now don’t worry, we won’t be building our builder pattern for embedded messages because fortunately, Discord.js RichEmbed constructor provides a builder for crafting these embedded messages.
On top of that,discord-botkit passes along this RichEmbed constructor in the package. Thus to utilize it, all you need to do is…
const embed = new discordBot.RichEmbed()
With this constructor, we can easily set fields with helper methods built into the concrete instance such as addField, setColor, etc.
For example, the following code would create this result (from the botkit-discord docs):
const embed = new discordBot.RichEmbed()
embed.setAuthor(
    "Quick RPG Stats",
    "https://rpglink.com/icon/here"
);

embed.addField("Power Level 👊", "Equivalent to a Goblin Archer 🏹");
embed.addField("Skills Acquired 🥕", "🏹 Archery, 🍳 Cooking");
embed.setColor('GREEN');

Now before we create our embedded Pokédex message, let’s reference the API to see what data is available to populate our required fields:
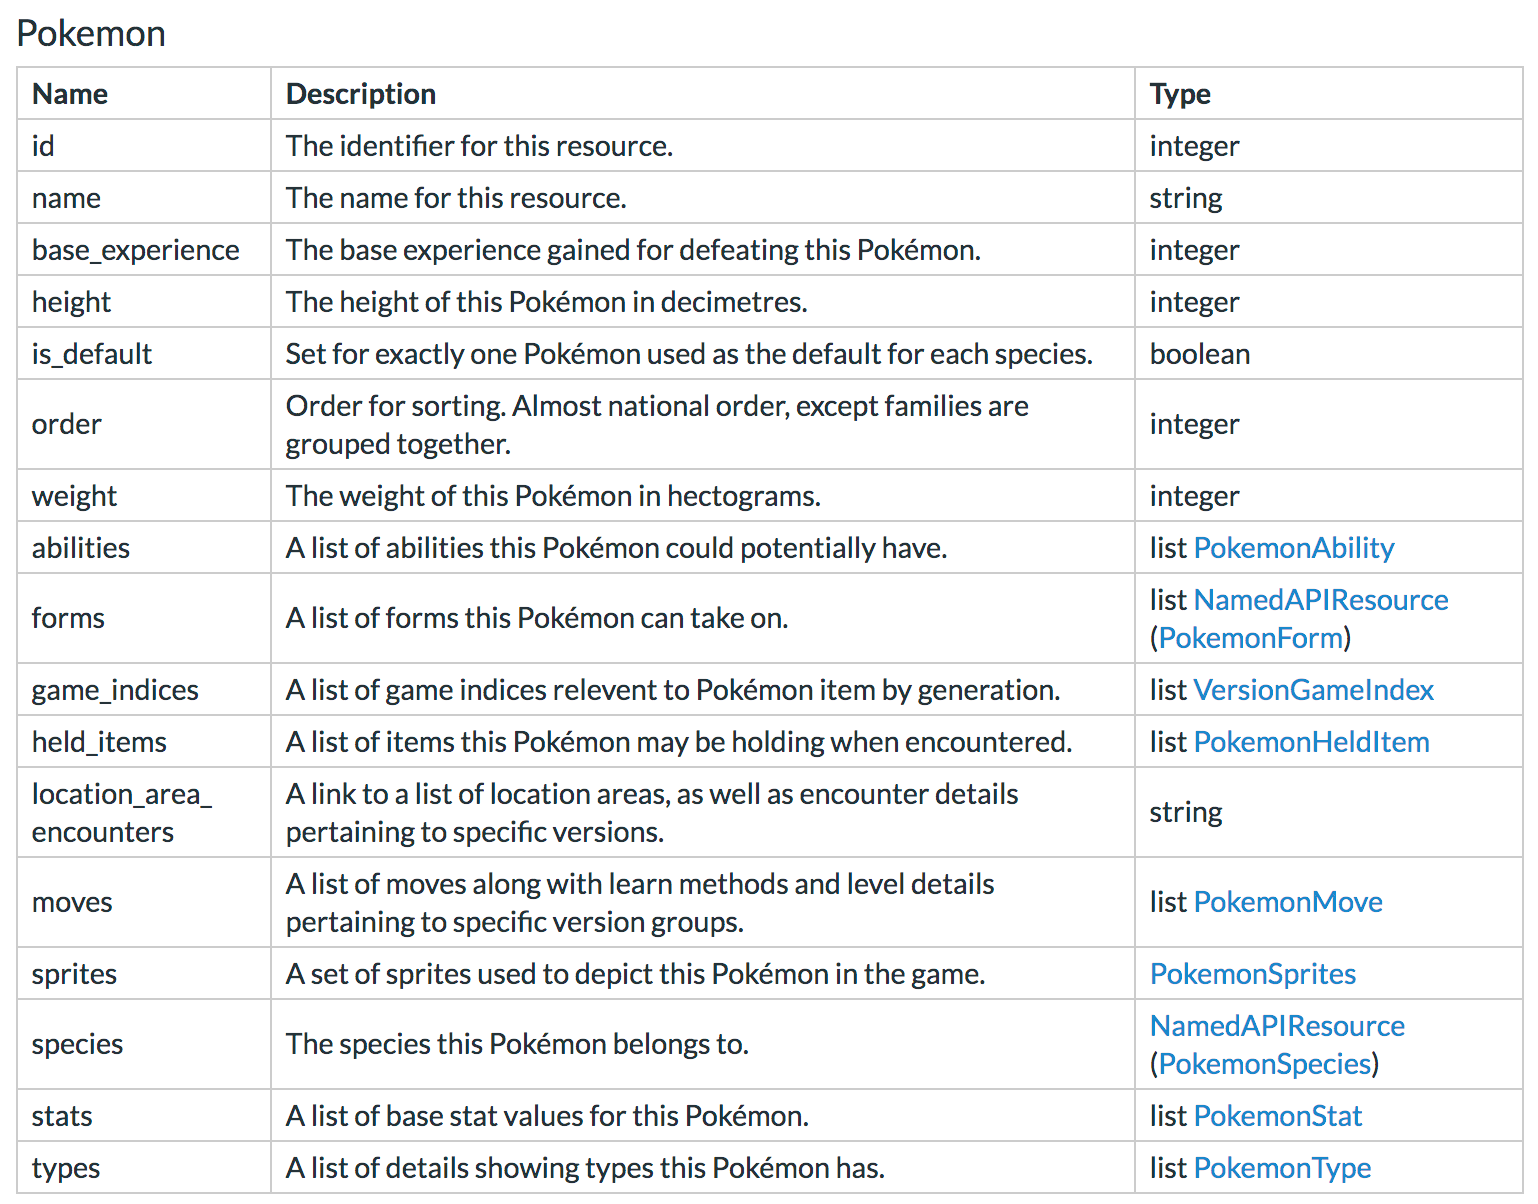
Refer to https://pokeapi.co/docs/v2.html/#pokemon
I prefer to list all the required fields and match them to their corresponding keys for a better visual reference:
-
Pokemon Number - (No. XXX) —
id -
Name —
name -
Sprite/Avatar —
sprites.front_default— let’s use the default front sprite -
Category —
types[1].type.name— We will grab just the first type for now -
Height - Ft’ Inches” —
height— in decimeter, we will need to convert to inches -
Weight - lbs —
weight— in hectograms, we will need to convert to lbs
If you notice the description is missing, don’t worry! It isn’t available from the first request, but I’ll go over how we can update our service to retrieve this as well.
Now we can build our embedded message.
Start by creating the embed message, which we will pull straight from the discord-botkit. Add the following constructor within the .then of your service search call:
Pokedex.search(parameter)
    .then(result => {
        const embed = new controller.RichEmbed();
    })
Next let’s populate the fields and send it to the response
embed.setAuthor(
    "Pokedex",
    "https://icon-library.net/images/pokedex-icon/pokedex-icon-15.jpg" // Grabbing this icon from icon-library
);
embed.setTitle(response.name)
embed.setDescription(`**No. ${response.id}** \n *${response.types[1].type.name}*`)
embed.setThumbnail(result.sprites.front_default)
embed.addField("Weight", result.weight);
embed.addField("Height", result.height);
embed.setColor("GREEN");
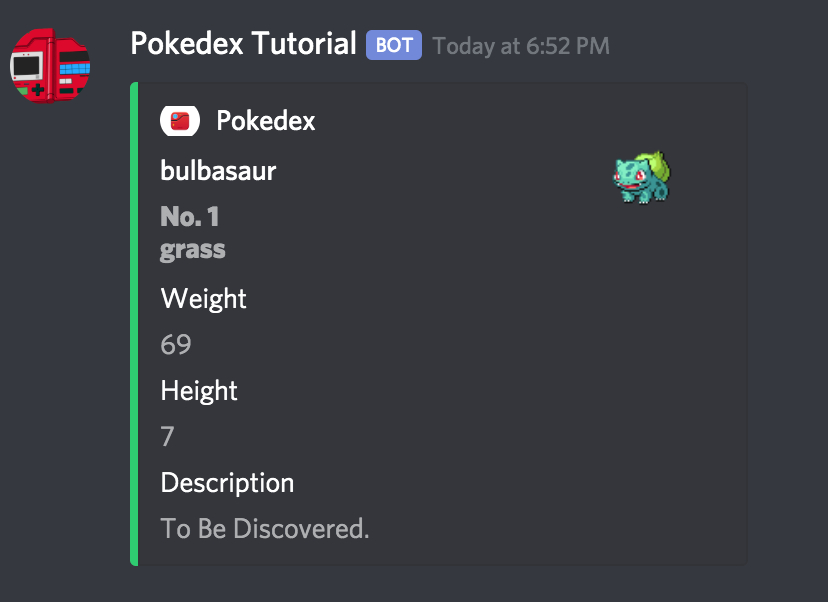
embed.addField("Description", 'To Be Discovered.');

bot.reply(message, embed);
Now if we put it all together, it should look like this:
Pokedex.search(parameter)
    .then(result => {
        const embed = new controller.RichEmbed();
        embed.setAuthor(
            "Pokedex",
            "https://icon-library.net/images/pokedex-icon/pokedex-icon-15.jpg" // Grabbing this icon from icon-library
        );
        embed.setTitle(response.name)
        embed.setDescription(`**No. ${response.id}** \n **${response.types[1].type.name}**`)
        embed.setThumbnail(result.sprites.front_default)
        embed.addField("Weight", result.weight);
        embed.addField("Height", result.height);
        embed.setColor("GREEN");
        embed.addField("Description", 'To Be Discovered.');
        bot.reply(message, embed);
    })
	.catch(() => {
        bot.reply(message, 'NO DATA')
    });
Time to validate our progress and re-run our bot with npm start
The Final Touches
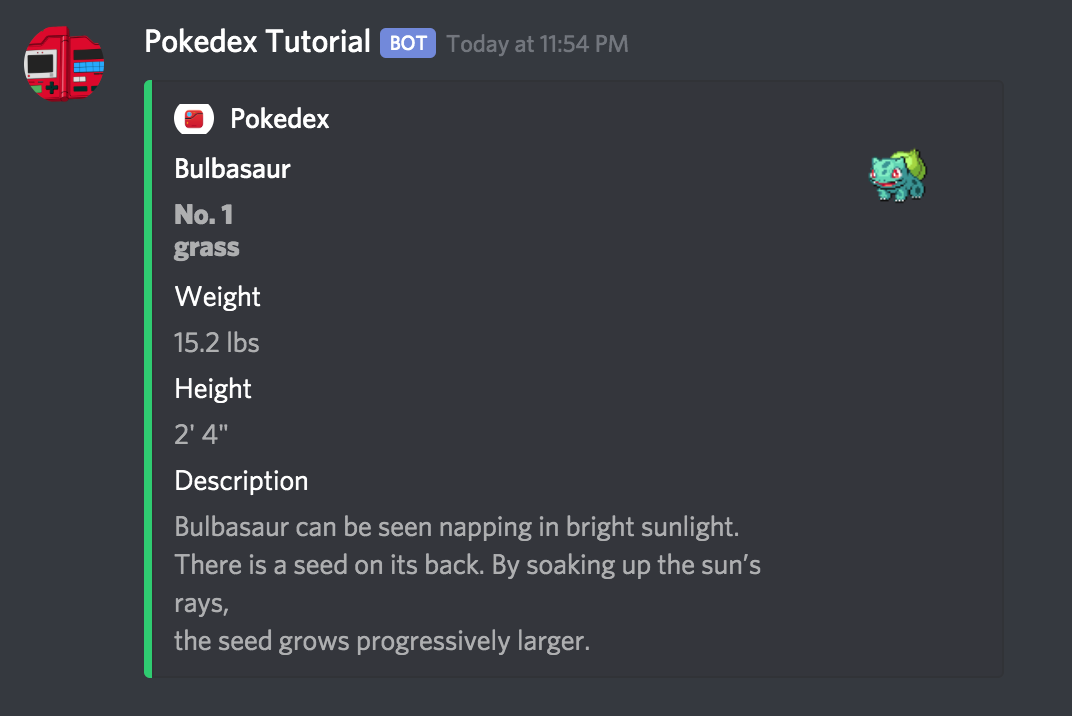
Excellent, time for the final touches: description, weight and heights conversions, and capitalizing the name.
For our description, we will need to perform another search called getPokemonSpeciesByName and combine that to our search result.
Let’s go back to our service/pokedex.js file, and merge the getPokemonSpeciesByName method results with our existing code.
Refer to Pokeapi Pokemeon Species to learn more about the structure for
I won’t explain everything that’s happening, as there are many tutorials covering Promise.all, but I provided comments for some context.
const Pokedex = require('pokedex-promise-v2'); // Import the SDK
const api = new Pokedex(); // Construct API

module.exports = {
	search: target => {
        // Promise.all to perform both API calls
        // This returns the results in an array
		return Promise.all([
			api.getPokemonByName(target),
			api.getPokemonSpeciesByName(target)
		])
        .then(results => {
            const nameResult = results[0]
            const speciesResult = results[1];

			// Filter for english descriptions
            const enDescriptions = speciesResult.flavor_text_entries.filter(flavor => flavor.language.name === 'en')
            // Use the first entry
            const description = enDescriptions[0].flavor_text;

            // Destructure the first set of results
            // and add a new description field from the
            // flavor text entries.
            return {
                ...nameResult,
                description
            }
        });
	}
}
Abra  , Kadabra
  !
!
We essentially create our own modified search results providing all the key data we need.
Now let’s update our embed with our latest description.
embed.addField("Description", result.description);
Let’s also format the weight and heights to reflect the good’ol imperial system to match the US Pokédex experience.
Install our helpful library called convert-units:
$ npm install convert-units --save
Add the following functions to your skills file — you can probably figure what’s happening here:
// Return <feet>' <inches>"
const formatHeight = (height) => {
	// height is in decimeter
    const meters = height / 10;
    const feet = convert(meters).from('m').to('ft-us');
    const parts = feet.toString().split('.');
    const characteristic = parts[0];
    const mantissa = `.${parts[1]}`;
    const inches = convert(mantissa).from('ft').to('in').toFixed();
    return `${characteristic}' ${inches}"`
}

// Return <lb> lbs
const formatWeight = (weight) => {
    // weight is in hectograms
    const grams = weight * 100;
    // Pokedex usually shows up to the tenth
    const lb = convert(grams).from('g').to('lb').toFixed(1);
    return `${lb} lbs`;
}
In addition, let’s add one more helper to format the name so that our results have an upper case in the first character of the name.
// Return "name" -> "Name"
const formatName = (name) => name.charAt(0).toUpperCase() + name.slice(1);
Now when we put it all together our embed update methods should look like so
embed.setTitle(formatName(response.name)); // Update
embed.setDescription(`**No. ${response.id}** \n **${response.types[1].type.name}**`);
embed.setThumbnail(result.sprites.front_default);
embed.addField("Weight", formatWeight(result.weight)); // Update
embed.addField("Height", formatHeight(result.height)); // Update
embed.setColor("GREEN");
embed.addField("Description", result.description);
And after we restart our server, we can finally test our end product, and should have the following response:
ALAKAM!
![]()
Finally we can see all that’s needed to build out the search functionality and how to build out a visual embed message.
Feel free to expand it even further by adding even more additional logic such as different colors based on types (blue for water?), additional attachments for sprites, or even other language supports!
So let’s recap, in this tutorial, we learned the following:
- How to create our first hears handler, !pokedex
- How to use the Pokeapi to return Pokemon results
- How to respond with Discord’s Rich Embed messages
Now, if you are still having troubles with the code, refer to Git repository in the PART_2 branch:
If you enjoyed this tutorial, please smash that clap button multiple times, and follow me on Github, YouTube, and Medium.
Feel free to check out my other Discord chatbot tutorial:
Stay tuned for the final part of the tutorial, where we go over how to utilize Google’s Text-to-Speech API to create audio functionality for our Pokédex!